You can quickly schedule a new event in Spark’s built-in calendar. Spark Classic syncs an event you create with your Google, Exchange, or iCloud calendar. For example, when you add a new calendar event with your Gmail account, it appears in the Google calendar across all your devices.
Add a new event
- Open the Calendar section on the sidebar.
- Click on the plus icon at the top left.
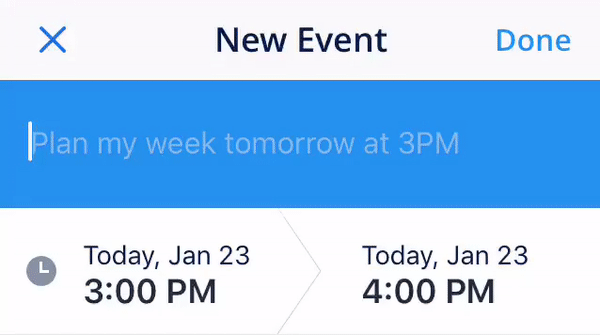
- Type a short event description and press Enter. Spark understands natural language; you can type, “meeting Monday 7 pm,” and it will schedule the right time.
- The new event is created in your default calendar. To change the calendar for this event, click on the calendar name at the top and choose the one you need.
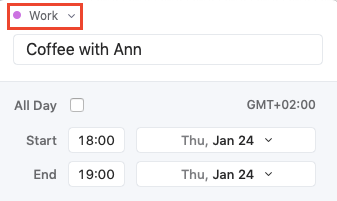
- Now, you can edit event details: Change its name, time, and date. If you want to create an all-day event, tick All Day.
- Under Alert, select when to receive a notification about this event. To add multiple notifications, hover the cursor over the Alert field and click on the plus icon. You can set up to five alerts for one event.
- To invite a person to this event, click on the Add Attendee field. Start typing a name or email and select a person from the list.
- If you want to add a call to this event, click Add Conference Call. Spark supports Zoom, GoTo, and Google Meet. Note: The Google Meet option is available only when you create an event in the Google calendar. Learn more about the third-party integrations in Spark.
- You can add an event location by typing its name in the Add Location field.
- Click Add Notes to add an event description.
- When you’re finished, click Create.
There is an alternative way to create a calendar event. In Spark calendar, right-click on a day or hour when you want to create an event and select New Event. Then, you can edit an event as described above.
Create a recurring event
Spark allows you to schedule events that automatically repeat on certain days. If you go to the gym every Monday and Wednesday, you can create a recurring event, and Spark will remind you about your workouts.
The recurring events are very flexible and you can customize them as you wish. For example, Spark can repeat an event every first Monday of the month till the end of the year, every three weeks on Fridays, etc.
- Open the Calendar section on the sidebar.
- Click on the plus icon at the top left.
- Type a short event description.
- Fill out the event name and select its time and date.
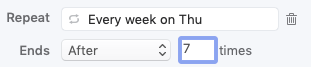
- Click Repeat and choose the event frequency. You can repeat an event every day, week, month, or year.
- For advanced settings, click Custom. Select the event frequency (daily, weekly, etc.) and choose when to repeat an event.
- Under Ends, select when this recurring event should end. There are three options: An event can be never ending or end after a certain date or number of times.
- Click Create to save this event.