Spark works with Gmail, iCloud, Yahoo, Exchange, Outlook, Kerio Connect, and other IMAP email accounts.
The first email account you add to Spark becomes your email for sync. When you want to use Spark on a new device, log in with this address. Your personal settings, added accounts and all emails will be synced automatically. To find out more about sync and how it works, check this article.
- Launch Spark on your Mac and click Start Using Spark.
- Enter your email address.
- Tick I agree to the Spark Privacy Policy and Terms of Service.
- Click Next.
- Follow the onscreen instructions of your email provider to sign in.
Note: If you want to connect to an iCloud account, you need to add the email address which ends with @me.com, @iCloud.com, or @mac.com and generate and enter an app-specific password to log in.
- Your email provider will ask if you allow Spark to access your account. Tap Allow or Agree.
- Click Start Using Spark. Now, your account is connected to Spark.
- Launch Spark on your iPhone or iPad. On the welcome screen, tap Skip or Got It.
- Enter your email address.
- Tick I agree to the Spark Privacy Policy and Terms of Service.
- Tap Next.
- A login screen of your email provider will appear. Follow the onscreen instructions to sign in.
Note: If you want to connect to an iCloud account, you need to add the email address which ends with @me.com, @iCloud.com, or @mac.com and generate and enter an app-specific password to log in.
- Your email provider will ask if you allow Spark to access your account. Tap Allow or Agree.
- Tap Start Using Spark. Now, your account is connected to Spark.
- Launch Spark on your smartphone. Tap Skip or Got It on the welcome screen.
- Enter your email address.
- Tick I agree to the Spark Privacy Policy and Terms of Service.
- Tap Next. If you use a Gmail account, you can choose Sign in with Google.
- A login screen of your email provider will appear. Follow the onscreen instructions to sign in.
Note: If you want to connect to an iCloud account, you need to add the email address which ends with @me.com, @iCloud.com, or @mac.com and generate and enter an app-specific password to log in.
- Your email provider will ask if you allow Spark to access your account. Tap Allow or Agree.
- Tap Start Using Spark. Now, your account is connected to Spark.
Tip: If you want to connect to a Google account, you need to tick Select All under the Spark wants additional access to your Google Account after entering your credentials
You can add more Email accounts to Spark.
Choose the account name, title, and color
- Click Spark at the top left of your screen.
- Click Settings > Accounts and select your account.
- Type your name in the Name: field. The name is displayed in the To: or From: field when you send or receive an email. If your account has no name, these fields are filled with your email address.
- Fill out the Title: field. The title is used only in Spark. This is the name of your account shown on the left sidebar. You can enter any title you wish to navigate your inbox easily.
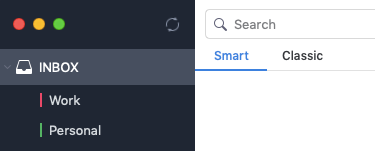
- Click on the Color setting to choose the color for your account. For example, you can pick red for your work account and use green for personal emails. It allows you to see which account each email in your inbox belongs to.
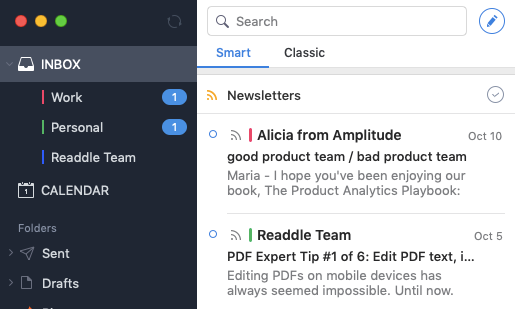
Note: To enable color coding for accounts, open Settings > General > Appearance and make sure the Color Coding for Accounts option is ticked.
- Tap the menu icon at the top left.
- Open Settings > Email Accounts.
- Tap the needed account.
- Write your name in the Name: field. The name is displayed in the To: or From: field when you send or receive an email. If your account has no name, these fields are filled with your email address.
- Fill out the Title: field. The title is used only in Spark. This is the name of your account shown on the sidebar. You can enter any title you wish to navigate your inbox easily.
- Tap Account Color and choose a color for your account. For example, you can pick red for your work account and use green for personal emails. It allows you to see which account each email in your inbox belongs to.
- You can also customize Notification Type here: tap the needed email account and Tick one of the notification types: All, Smart, No Notifications. To learn about notifications in Spark, check this article.
- Tap the menu icon at the top left.
- Tap Settings .
- Choose Email Accounts.
- Tap the needed account.
- Write your name in the Name: field. The name is displayed in the To: or From: field when you send or receive an email. If your account has no name, these fields are filled with your email address.
- In the Title: field, write the name of your account. The title is used only in Spark. This is the name of your account shown on the top of the sidebar and in the mail accounts settings.
- Tap Color Coding and choose a color for your account. For example, you can pick red for your work account and use green for personal emails. It allows you to see which account each email in your inbox belongs to.
Note: To make sure coding for accounts works properly, open Settings > Email Accounts > Color Coding and enable the toggle Color Coding for Accounts.